一、概述
本篇文章我们在原来代码的基础上进行了一定的模块拆分,并处理以上两个问题
原文链接:
https://www.cnblogs.com/swarmbees/p/10035127.html
二、模块重新划分
1、 新增my_job.py文件,把任务模块单独划分出来
之前的定时任务使用的是apscheduler库做的,并且任务类在main函数所在py文件中,这样导致主py文件很难进行修改
2、 新增util.py文件
包含公用的方法,比如目前的字典转字符串
3.、新增weather_service.py文件
主要负责构造windows服务,也是一个主py文件,不同于第一篇文章的主py文件weath_report.py,这是我们实现的两种定时任务,可分别运行,如果想把天气信息通知微信好友则启动weath_report.py,如果是通过发送邮件的方式则直接把weather_service.py安装成windows服务,并启动即可,记住需要配置运行的任务列表,下边会讲述怎么配置任务
4、 新增timing_task.py文件
包含任务方法executeJob(),主要是在服务中循环跑,然后在合适的时间爬取天气并发送到指定邮箱,任务的参数是通过配置json串来实现
三、优化定时任务
本篇文章的定时任务是运行在windows服务中的,因此我们首先需要安装pywin32模块
1.、安装pywin32
pip install pywin32
2.、服务操作相关命令
1.安装服务 python PythonService.py install
2.让服务自动启动 python PythonService.py --startup auto install
3.启动服务 python PythonService.py start
4.重启服务 python PythonService.py restart
5.停止服务 python PythonService.py stop
6.删除/卸载服务 python PythonService.py remove
3.、启动服务时被拒绝
Installing service timingTaskDaemon
Error installing service: 拒绝访问。 (5)a.大多数原因是由于python环境配置的问题,python默认安装时配置的pah是用户环境变量,这里我们需要改成系统环境变量,具体可以参考Python 写windows service 及 start service 出现错误 1053:服务没有及时响应启动或控制请求
b.考虑命令行是否有权限,我自己的win8系统默认权限就不够,需要右键管理员启动才可以
4、 实现windows服务功能,我们需要继承win32serviceutil.ServiceFramework这个类,把需要执行的业务逻辑放入SvcDoRun函数中,如下代码中executeJob()函数即为我们定时执行的任务
class WeatherPythonService(win32serviceutil.ServiceFramework): _svc_name_ = "weather_service_test4" _svc_display_name_ = "weather_service_test4" _svc_description_ = "i am a test weather_service_test" def __init__(self, args): win32serviceutil.ServiceFramework.__init__(self, args) self.hWaitStop = win32event.CreateEvent(None, 0, 0, None) self.run = True def SvcStop(self): self.ReportServiceStatus(win32service.SERVICE_STOP_PENDING) win32event.SetEvent(self.hWaitStop) self.run = False def SvcDoRun(self): while self.run: executeJob() time.sleep(5) if __name__ == '__main__': win32serviceutil.HandleCommandLine(WeatherPythonService)
5、任务执行函数
def executeJob(): now_time = time.localtime(time.time()) now_hour = now_time.tm_hour now_minute = now_time.tm_min for job in my_jobs: ts = job['time'] for t in ts.split(','): jobtime = t.split('.') h = jobtime[0] m = jobtime[1] if (now_hour != h and now_minute != m): code = city_code.find_code(job['city']) wea = getWeath(code) strWea = strDic(wea) title = '{}天气预报'.format(job['city']) send_email(job['receivers'], 'title', title + ":\n" + strWea)
任务执行时,需要配置任务执行列表,即上述代码中my_jobs对象,该对象是一个标准的json串,不同于上一篇文章的json格式,本篇文章的任务参数如下,任务整体是一个数组,数组中包含了任务对象,每一个对象由3个字段组成,分别是邮件接收者邮箱receivers、爬取城市city和爬取时间time
my_jobs = [{ "receivers":['1134024095@qq.com'], "city":"昌平",
"time":"6.30,17.30" },{ "receivers":['1134024095@qq.com'], "city":"海淀", "time":"6.30,17.30" }]
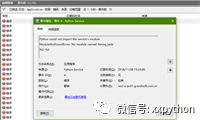
6.、安装服务,成功启动后,但是任务没有正常执行,可以通过查看系统任务事件来确定错误的原因,如下图所示,这是我在排查错误的时候截图
查询系统日志:win+r 回车输入 eventvwr.exe 在回车
四、发送邮件
这里我们使用QQ邮箱作为示例进行演示,发送邮件使用smtplib库
1.、QQ邮箱发送需要申请口令,申请方式
2、 选择邮箱发送服务器smtp.qq.com和端口号465
3.、构造发件人、收件人和邮件内容
message = MIMEText(text, 'plain', 'utf-8')message['From'] = formataddr(["就差一点儿", sender]) # 括号里的对应发件人邮箱昵称、发件人邮箱账号message['To'] = Header(','.join(receivers), 'utf-8')#接受者message['Subject'] = Header(title, 'utf-8')
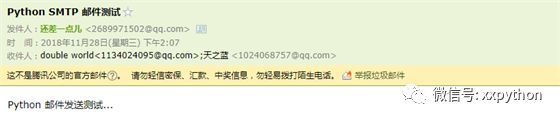
text为邮件内容,通过From构造发件人信息,To构造收件人信息,这个构造的只是显示的文本串,如本小节底部截图所示的收件人和发件人等,真正的接受邮件的账号在发送邮件时指定。
4.、连接邮箱服务器、登陆
smtpObj = smtplib.SMTP_SSL()smtpObj.connect(mail_host, mail_port) smtpObj.login(mail_user, mail_pass)
5、 发送邮件
smtpObj.sendmail(sender, receivers, message.as_string())
6.、邮件发送成功
7、 完整发送邮件代码
def send_email(receivers, title, text): message = MIMEText(text, 'plain', 'utf-8') message['From'] = formataddr(["就差一点儿", sender]) message['To'] = Header(','.join(receivers), 'utf-8')
message['Subject'] = Header(title, 'utf-8') ret = True try: smtpObj = smtplib.SMTP_SSL() smtpObj.connect(mail_host, mail_port) smtpObj.login(mail_user, mail_pass) smtpObj.sendmail(sender, receivers, message.as_string()) except smtplib.SMTPException: ret = False f = open('./sendemail_weather.log', 'a', encoding = 'utf-8') if ret: f.write(datetime.datetime.now().strftime('%Y-%m-%d %H:%M:%S') + ':邮件发送成功\n') else: f.write(datetime.datetime.now().strftime('%Y-%m-%d %H:%M:%S') +':无法发送邮件\n') f.close()
8、测试发送邮件
send_email(['1134024095@qq.com','1024068757@qq.com'], "昌平", "6.30")


